Box |
| Box |
Vermicompost Box -
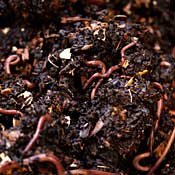 Composting Box system
The home system requires: |
| A BOX or a container for the redworms |
| Redworms, microorganisms and macro-organisms |
| A controlled environment: temperature, moisture, acidity |
| A maintenance program: bedding preparation, food waste burying, separating redworms from compost and using compost - Where to Put It - Consider the needs of redworms and needs of the owner. Redworms need controlled temperature, controlled moisture content, controlled aeration and proper pH.  - Temperature: - Redworms tolerate a wide range of temperatures, however, the ideal temperature is between 55 ? 77 degrees F. Bedding with a temperature above 84 degrees F. is harmful, sometimes fatal, to redworm populations. The temperature should be measured inside the box, because the temperature in the moist bedding is usually lower than the outside air.
Redworms should be protected from freezing temperatures. Temperatures below 50 degrees F. slow down worm activity. - Moisture Content: - Redworms need a moist environment. Worms breathe through their skin. Skin must be moist in order to breathe. - Aeration: - Redworms need oxygen to live. They produce carbon dioxide. Air circulation is a must in and around a worm box. - pH level: - Redworms do best if the pH is around 7.0, however, they can tolerate levels from 4.2 to 8.0 or higher. Lime (calcium carbonate) may be mixed with the bedding material to correct acidity or to maintain a more favorable pH. Pulverized egg shells also correct acidity. (Warning! Use only limestone and never hydrated lime. The wrong kind of lime will kill the worms!) - Owner Needs - 1. Convenience for maintaining the worm box 2. Aesthetic preferences: Kitchen? Garage? Basement? Or Bedroom?? - What Kind and Size Container? - - Shape: - The box or container should be shallow, not more than 1 1/2' deep. Redworms tend to feed in the top layers of bedding. Materials may pack down if spread too deep. - Size: - Size depends on the average pounds of kitchen waste per week. A box measuring 1' by 2' by 3' can handle 6 pounds of kitchen waste, which is the average for families from 4 to 6 people. A smaller sized box, 1' by 2' by 2', can handle kitchen waste for 2 people. - Material: - Never use a recycled container that might have been used for chemicals! Treated wood could be harmful, also. Some examples of good materials to use might be: |
| Wooden pallets |
| Old Rubbermaid containers |
| Old ammunition boxes |
| Go to the Re-store for ideas! - Bedding: - 1. Corrugated cardboard is an excellent material for bedding. Be careful not to breathe in the dust if you shred it. Corrugated cardboard holds moisture better than any other material. Some people use a piece of corrugated cardboard to cover their bedding. In a ?wet? environment, it can help to absorb some liquid, and will eventually disintegrate 2. Shredded newsprint and computer strips can be used. The papers should be shredded in long lengths of 1?4? wide strips. It's easily moistened, but the strips don't keep the moisture as well. Strips provide more surface area from which the water can evaporate. They require frequent moistening. The black ink used for printing the newspaper is not toxic to redworms. The main ingredients of black ink are carbon and some oils. Colored ink should be avoided. There used to be heavy metals, such as lead and chrome, in colored ink. US Government regulations now forbid the use of heavy metals in colored ink for printing newspapers. 3. Shredded newspaper is the most economic material. Make the strips from one to two' long by 1?2 to 1? wide. Redworms will eat the paper after it has softened. 4. Some people may object to the initial odors of animal manures. It is not recommended to use manures if the box will be located in your living area! Animal manures have other organisms such as mites, sowbugs, centipedes or grubs that you wouldn't want in your home. But if the box will be outside or in a garage, manures would be fine. Worms really like manures. Reminder - no pet, people or pig manures! 5. Old decaying leaves are a good source of bedding. Some leaves are better than others are. For example, maple leaves are preferred over oak leaves, because the latter take longer to break down. Leaves from trees growing along heavily traveled roads could be dangerous because of possible lead accumulation on the leaves. 6. Peat moss can be used if mixed with other bedding materials. It has an excellent moisture holding capacity, however it provides no nutrients for the worms, and can be expensive. 7. A handful of soil provides the grit worms need for breaking down food particles within the gizzard. Since worms don't have teeth, their food must be broken down by muscle action in their gizzards. - How many worms to start with? - The number of redworms needed depends on the daily food waste. There is a worm to daily food ratio. The ratio is 2 pounds of earthworms for each pound of food, in short: 2:1. For example, 1 lb. worms can eat 3.5 lbs. food waste per week, or .5 lb. per day. How many redworms there are in a pound of worms depends on the size of the worms. Commercial growers estimate that there are 1000 breeders (sexually mature) in one pound of worms. A dealer in baits for fishermen expect not more than 600 worms per pound, otherwise his buyers might complain. New hatchlings are very small, and sometimes 150,000 are needed to make one pound. If you order pit-run worms (worms of all sizes and ages) by the pound, you will have lots more worms than if you should order breeders by the pound. - Setting up a Worm System - - You need: - 1. A worm box 2. Bedding 3. A couple of handfuls of soil or sand 4. A scale, if you want to know how many pounds of food waste you have. 5. Moisture. Worms' bodies and the bedding should have the same amount of moisture content. This amounts to 75% to 90% moisture content. Water: Bedding ration = 3:1 by weight. Three pounds water to one pound bedding. If using dry bedding such as shredded paper, newspaper strips or cardboard, you need to wet it. One way is to put the material in a bucket and add water to it, until it is saturated. (That would be about a minute or two.) - Manure bedding - If using composted manures, it is more difficult to determine moisture. Be careful not to make the manure soggy! If the manure is too soggy, add some dry material to it, such as shredded paper cardboard or leaf mold. The goal is to keep your worm bin under aerobic rather than anaerobic conditions. - Moisture and Temperature - A few drops of moisture released by squeezing could be a guideline for the right amount. If five or more drops are produced the material is too wet. The ideal temperature for worms is between 55 and 77 degrees Fahrenheit. - Adding worms to bedding - When bedding is ready for the worms place the worms on top. They will disappear in a short time in the bedding. They don't like light. By keeping some bright light close by the box the worms will disappear faster in the bedding. If some stay on the surface after some time, assume that they are unhealthy or maybe dead, and remove them. - Food - Most kitchen waste or table scraps, any vegetables, grapefruits, orange rinds, apple peels, lettuce and cabbage, celery ends, spoiled food from the refrigerator, coffee grounds, tea bags, egg shells are all suitable worm meals. (Remember, no meat or dairy products belong in a worm bin.) Don't use meat or milk products in the worm bin. Mice and rats could be attracted to the odors! Also, non-biodegradable materials don't belong in a worm box. - Burying kitchen waste - One way to manage a worm box is to pick a different spot to bury kitchen waste in the box. A 2'x2' box has approximately nine locations where you can bury wastes. That gives you nine feedings before you have to repeat the cycle. You need some air circulating in the box, or bad odors could occur. Worms will usually like the earlier buried food wastes. They like decaying organic wastes best. They do not always wiggle to the newly added fresh food waste. They like the bacteria, fungi, and protozoa to break it down first! Worms help keep the decaying material aerobic and help keep conditions free of odors. They produce castings at the same time. There are many other techniques for adding kitchen wastes, which vary with owner preference and the type of box or container. Some people may just have worms in a garbage can with holes drilled on the sides for aeration. Some bury this foot deep in the back yard, and worms can come in and out as conditions vary. They just throw the kitchen wastes on the surface. (Make sure you have a tight lid that is raccoon proof!) They may add some materials such as sand, soil or peat moss on top. Just be sure not to fill it too high with food and bedding, or it will pack down and may become anaerobic. Whatever works for the specific situation is fine - provided there are no odors or other problems. - Grind food waste? - Grinding food waste is extra work. These kitchen wastes break down in a very short time. Eggshells should be pulverized. Although redworms have very tiny mouths, and ground food would be easier for them, we want them to help us with kitchen waste! Too much time and energy spent preparing their food can be discouraging. - Overloading the system - The size of box and amount of worms are deciding factors for how much food should be put in the box. Remember the 2:1 ratio for worms. Two pounds of worms is needed for one pound of food per 24 hours. The surface area of the box should be 7 square feet if 7 pounds of waste in one week is consumed. If too much kitchen waste is produced on certain occasions, the wastes could be temporarily stored in another container for use later. An overloaded worm box can become anaerobic, and stinky! If that happens, don't add any fresh kitchen waste. If you leave it alone for a while, the situation will correct itself. - Do I need a worm sitter? - If you're going on a vacation, you could feed the worms a little extra just before you leave. This is the best part of having worms as pets! Feed them and leave them undisturbed. This way, you can go away for weeks. If you leave for longer than 3 weeks, it might be good to have a worm loving friend come and feed them once. - Observe the worms - The less you disturb worms, the better off they are. However, you should make regular observations to know what is going on in the box. The best time to do this is at feeding time. Is the bedding still moist? Is the temperature inside the box between 55-77 degrees? Sometimes you find many worms at one spot in a feeding frenzy. Note what they like and don't like. Look for worm eggs and baby worms. Are there any mating worms? Worms usually fascinate children. It is a good science project for children. However, point out to the children that the worms don't like to be too much or too often disturbed. They can't tolerate bright light. A red light could be practical for observations of the worms. - Different foods for different worms - Younger worms often are all congregated by a certain food item. Older worms sometimes are feeding on another. Older worms love to fill up the inside from halved grapefruits or oranges. - Recording observations - You can keep records of your experiences and improve your skills by sharing knowledge with others. Many people are interested in ?vermiculture.? You may be called on for information on composting with worms. - Harvesting castings and changing bedding - After weeks of adding food wastes the bedding goes down. This is a combination of worm activity and the microorganism activities. Decomposition and composting are taking place. The color of bedding becomes darker. The favorable environment for the worms decreases. The large amounts of castings might become harmful to the worms. Castings of one worm are toxic to another worm. When to change the bedding depends on the bedding used, the quantity of the earthworms in the box, temperature and moisture conditions. Four to six months is a good guess for keeping the same bedding, if the worm boxes are correctly maintained. - Let the worms do the sorting - If you prefer only to add some new fresh bedding, carefully move the old bedding to one side of the box. Add the fresh bedding in the open space and start feeding in the new bedding. - Divide and dump technique - To divide the worms from the old bedding, dump the contents of the worm box on a sheet of plastic or a table. The worms will go down in the pile if you expose them to light. After a short time remove the top layer of the bedding up to the point you encounter worms. Wait a short time, and continue removing the bedding. You will end up with lots of worms in a small pile. If too many worms are left, some could be supplied for starting another box. Sources: Joyce Jimerson, Cooperative Extension, Washington State University |